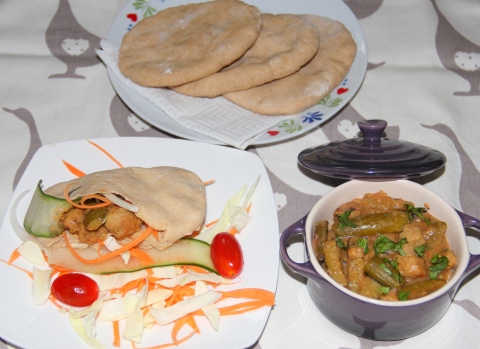
Pita whole wheat bread
About:
This is a healthy way to include fiber in your diet. Make pita bread at home! This is super easy, very healthy and tastes so much better than the store-bought.
You can make pita bread either in the oven or on the stovetop, and there are advantages and disadvantages to both. In the oven, pitas puff up much more grandly and make softer pockets, but they stay pale-colored and fairly mild-tasting. On the stovetop, you lose some of the impressive puffing, but gain tasty and crunchy toasted spots on the surface of the dough. So enjoy either way of your choice.
Pockets of pita breads can be filled with your favourite fillings/salads and even Falafel (link).
I served this with Tindora and soya chunks gravy (link) and salad
Yields- 6 – 8 breads
Preparation time – 20 minutes
Baking time- 5-6 minutes/batch
Resting time-20-30 minutes
Ingredients:
- Whole wheat flour- 2 cups
- Active dry yeast-2 tsp
- Warm water- ¾ to 1 cup
- Salt-to taste
- Honey-1tsp
Procedure:
- Combine 1/4cup water, honey, yeast in a bowl and let it rest on the counter for 5-10minutes
- Sift in flour, salt together in a mixing bowl.
- Form a well in the centre; add in yeast mixture and warm water until well combined.
- Once combine transfer on to the lightly floured surface and knead for 4-5minutes or until the dough is smooth and elastic.
- Now transfer the dough to the greased bowl and allow it to rest for 30minutes with a wrap on.(during winter it might require more resting time)
- Pre-heat the oven at 220deg C. Line the baking tray and set aside.
- After 30minutes punch down, knead lightly and divide to medium sized balls.
- Dust some flour and roll each ball into a 5-6inch circle about 1/4inch thick and arrange on the lined baking tray without overlapping. (you might bake them at 2-3batches)
- Bake them in the middle rack for 5-6 minutes, flipping half way. (don’t over bake just lightly brown will do)
- When the pitas come out of the oven they will be hard, but they will soften as they cool.
- Store them in an airtight container wrapped in a kitchen towel while they’re still warm.
Serving:
- Slice the bread into two and stuff the pockets with a fillings and salads.
- If using stove top make them similar way to Chapattis
Posted on September 25, 2014, in Indian, Main dish. Bookmark the permalink. 29 Comments.


Oh that does look good
LikeLike
Thank you…
LikeLike
Youre welcome
LikeLike
Reblogged this on MrMilitantNegro™.
LikeLike
Thanks for your support
LikeLike
I love pitas and nan. 🙂
LikeLike
That’s nice to know Jackie…Hope you like this recipe
LikeLike
Thanks for the recipe Chitra , always wanted to try this….
LikeLike
My pleasure Malar…. good day… 🙂 🙂
LikeLike
Yum, that looks amazing! I love pita bread, homemade sounds great 🙂
LikeLike
Thanx June for your encouraging words and being here…. feels good… good day… 🙂 🙂
LikeLike
Chitra, the kneading … I’ve just been discussing this very thing with Prachi, who sent me the link to a video on the topic: http://www.kingarthurflour.com/videos/bread-101-basic-white-bread-kneading-techniques
Question is, can this method be used in all forms of bread-making – specifically, of course, for this recipe of yours ?
LikeLike
Yes M-R this works even for my recipe. Feel so happy that you find information from various sources…that’s a real blessings for me
LikeLike
In which case … watch this space … 😉
LikeLike
Definitely will be waiting to hear your feedback on the recipe M-R
LikeLike
Wonderful idea Chitra! I love pita bread!
LikeLike
Thanks Lori
LikeLike
nice one.. didnt know the recipe…
LikeLike
So glad you got the recipe…
LikeLike
Love bread and I love your Pita, Chitra 🙂
LikeLike
I love your feedback… thanx a million bunch Linda… 🙂 🙂
LikeLiked by 1 person
Wondering your creativity and love to experiment! It looks like those sweet buns we prepare at home in our native…
TC! Keep smiling 🙂 Happy cooking!
Regards,
Sindhu
Tantu
The Arts & Me
LikeLike
Sindhu – Each appreciation of yours works like a magic for me…Thanks dear for being a motivator…
LikeLike
Very nice Chitra.. Have been looking for whole wheat version to pitas from lo g.. Saving the recipe.. 🙂
LikeLike
Thanks Shikha glad you liked it..I am happy that your waiting list is being filled now…Await to hear how this recipe turned out for yourself
LikeLike
Homemade pita bread? Wow that’s awesome dear
LikeLike
Thanx dear V….
LikeLike
Oh love homemade pita bread. Your pita looks perfect. Never tried on the stove top. Sounds like a great option.
LikeLike
Suzanne – that so nice to hear from you…They made on hob but it came out really well…
LikeLike